Introduction By Peter Follansbee
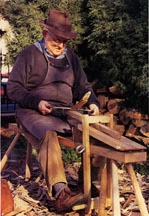
The basic “workbench” for shaping with a drawknife or spokeshave is the shaving horse. The two traditional shaving horse styles are the Continental schnitzelbank or dumbhead and the English bodgerís bench.
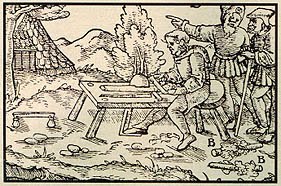
While the dumbhead shaving horse is seen in 15th and 16th-century illustrations, there is no pictorial or documentary evidence for the English style prior to the late 19th Century. It was in use by the time that H. L. Edlin’s Woodland Crafts in Britain: an Account of the Traditional Uses of Trees and Timbers in the British Countryside (1949) and J. Geraint Jenkins’ Traditional Country Craftsmen (1965) were recording the disappearing traditional woodland crafts of Britain. The English shaving horse may simply have escaped from record and, I suspect, its appearance in the 19th—20th Century was as a long- held, traditional tool. Whatever its origins, the English-style horse is a very effective alternative to the Continental style.
In the Jenkins and Edlin studies it is used for preparation of stock for turning, and also to make various hoops, rake handles, etc. So the common criticism of english-style shaving horses—that they are only for short stock—is exaggerated. Longer “stuff” needs to be pulled out from under the yoke to be turned end for end as opposed to the Continental style in which the stock is just slid out from beside the “head.”
I remember a debate many years ago about the use of the English shaving horse versus the Continental dumbhead. For preparing turning stock and shaving chair parts, I strongly prefer the English shaving horse because the action of gripping the stock is centered, as opposed to the off-center action of the dumbhead style.
The traditional English shaving horse, with a free hinge mechanism, makes it easy to adjust the height of the work surface. This allows one to set the yoke as close to the workpiece as possible, which translates into easier foot action to achieve the most positive gripping of the workpiece.
Construction Notes by Jenny Alexander
1. All wood can be fabricated, and assembled tree-wet. Stock can be rived, drawknifed, and scrub-planed. Adjustments for shrinkage can be made from time to time. Coat endgrain surfaces to retard moisture exchange.
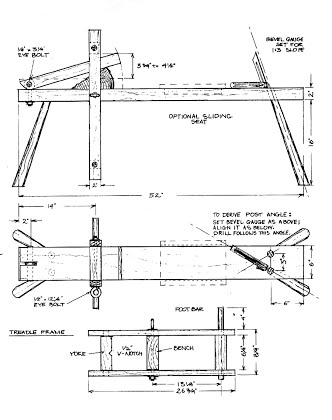
Tallow, wax, and commercial endgrain sealer (emulsified wax) all do the job. If you do not rive from the tree, search out a saw mill and buy green wood. Save energy and expense. Yellow pine, cheaper than oak, will do the job. Full 8/4 stock is good for all parts. Be sure to use straight-grained, shavable wood for the posts. Salvaged pallet wood can be used for the yoke, treadle sides and foot bar. Sometimes you can even find good pallet wood for posts. Nursery tree posts are cheap. Use what you can get, but always choose the hardest (heaviest) available wood. Oak is preferred. Straight-grained stock is crucial. Treadle frame sides can be made from surveyor’s stakes. Straight-grained 1″ x 2″ oak is preferred. A bench 52″ long works well for most people; a 56″ long bench will do for those 6′ and over.
2. The flare of the posts is a compound angle determined by two things: a flare angle line (the oblique sides of a 3″ equilateral triangle whose base is located 6″ in from the end of the bench) along the plane of the bench surface.
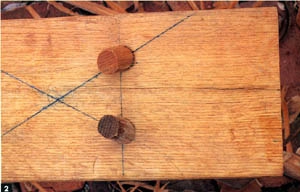
1:3 slope erected perpendicular to the bench surface with its included angle resting on the flare angle line. An adjustable bevel gauge set at a slope of 3 (vertical) to 1 (horizontal) on the flare angle line with the bevel blade aiming at the center of the proposed post mortise determines the bit’s direction. Bore a 1″ diameter pilot hole.
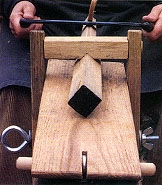
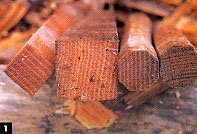
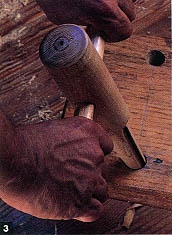
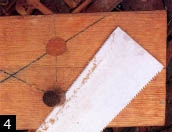
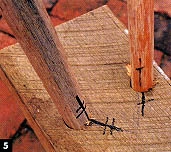
3. Taper the mortises first. I prefer an included taper angle of 1:12. The more acute the angle of the taper the better. A reamer can be made from saw steel slipped into a slot in a turned hardwood cone (3). The post tenons are shaved to fit these mortises. After the posts are driven home and trimmed to length (4), mark each matching mortise and tenon and index the correct orientation of each post on the underside of the bench. I use a permanent marker (5).
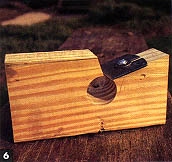
4. Tapers readily adjust to moisture changes. Just whack the bench down on the posts at the beginning of work. The harder you sit, the tighter the fit. Conversely, it is easy to break the horse down. When shaving a post, first make a 2″ x 2″ x 22″ square stick. Then taper, in the square, from 2″ down to 1-1/4″. Then, and only then, chamfer the stick into octagonal shape. Lastly, shave the top of the post to match the mortise. You can make a hollow tapered tenon auger (6), but it really isn’t necessary.
Drive them home again and trim to length so that the top of the bench is about 18″ above the floor. If the posts are green, they will shrink in time and protrude up through the bench. Drive the posts home again and retrim.
5. The sliding chock is split from a 6″ long log. If during use the chock slips, wet it and the adjacent bench surface. The sliding optional seat (10″ x 8″) has battens underneath. Secure a flat piece of inner tube or rubber roofing underneath the seat to prevent sliding.
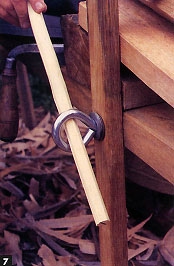
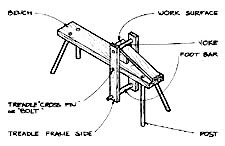
6. The eyebolts are standard hardware. The dimensions on the diagram are overall dimensions. Use wing nuts if you can find them. The eye on the treadle eyebolt should be on the shaver’s “handy” side (shown in the diagram for a right-handed person). All-thread can be used, but an eyebolt is more easily tightened (7).
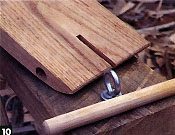
The fit between the work surface slot and the eyebolt at the end of the bench should be tight. The work surface wooden cross peg should also fit snugly in both the bolt eye and the hole bored across the work surface (10). One objection to the eyed metal treadle cross bolt is that edge tools can get nicked on the metal. I have also used threaded wood screws for both the treadle bolt and the work surface pivot. [See the accompanying sidebar for Peter Follansbee’s alternative construction.]
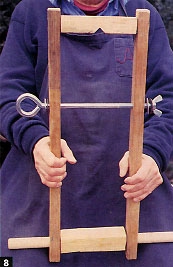
8. The treadle throat opening is the vertical distance between the top of the work surface when resting upon the bench and the bottom of the yoke. This distance is crucial—about 3-3/4″ to 4-1/2″ works best for most people (8).
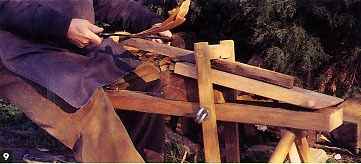
The larger the throat opening, the more the work surface points upward. The shaved stick should aim at your belly button or a little above (9). If the shaved stick points too high, your shoulders will lift and cramp. After you have made the bench and work surface, mock up a treadle frame from furring strips to make sure that your arms are comfortable. You will spend a lot of time and effort at your horse—don’t waste them.
9. The 1″ dowels on both the yoke and foot bar can be turned or whittled. Because of the two cross members are removable, the treadle frame is easily broken down. The yoke can also be pivoted by screwing 3/8″ lag screws into the ends of the yoke and hack sawing off their heads. Don’t forget the 1/2″ deep notch in the middle of one of the yoke surfaces. It is crucial for shaving square stock into octagons. The yoke should rotate freely enough so that when it is lowered it will slap down on the work surface. When the yoke and work surface become burnished wet them down. I use a spray bottle. Leather or rubber can be attached to the unnotched yoke surface. Because I use water, I don’t find this necessary. I’ve seen a piece of toothed saw blade or Sureform® blade screwed to the yoke. Effective, but they chew up the work piece.
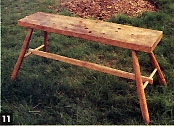
10. When the shaving horse is completed, make a low bench with the same height and a 9″-10″ x 36″ top (11). This low bench holds your tools while working. It is an invaluable assembly bench and useful for other tasks not suitable for a carefully maintained, waist height workbench. The low bench and the rear of the shaving horse work together as a pair of saw horses.
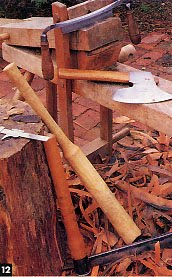
11. Good shaving and green woodworking (12). Wood is wonderful !
Peter Follansbee’s All-Wood Horse pictures and notes:

Twenty years ago I built and used a shaving horse based on the one in John Alexander’s Make a Chair from a Tree. When John later improved his shaving horse, I copied and adapted his newer version for use in my joiner’s shop at Plimoth Plantation in Plymouth, Massachusetts. I use the shaving horse mostly for preparation of turning stock and working various short lengths of “stuff” in the course of making the furniture used in Plimoth’s recreated 1627 houses. For various reasons, I wanted an all-wood shaving horse, so I’ve changed a couple of things about the example John describes in his article. My version requires slightly more effort to make, but it is not all that difficult to produce. A few of the components are turned on a lathe, but these could be shaved or whittled as well. Instead of using an eye bolt as the work surface pivot, I substituted a wooden block tenoned through a mortise in the workbench. This block consists of a head and a shaft. The head stands above the workbench and serves as the pivot for the hinged work surface. The work surface has a notch cut in its end to slip over this block. A 1/2″ diameter wooden pin serves as the pivot bar. The shaft of the block is tenoned through the bench and secured underneath by a wedge driven through a tapered mortise in the shaft. Again, I’ve substituted a wooden component for the eyebolt that John uses for the treadle frame assembly. The treadle frame sides on my version swing on a turned piece. One end has a head about 1-1/4″ in diameter. The shaft of the piece is 7/8″ diameter and protrudes through the bench and the opposite arm. A tapered wedge driven through the shaft fastens the entire treadle frame apparatus together. The yoke and foot pieces are made in essentially the same manner as those on John’s example. The only other difference in my bench is that the bench itself and the work surface are made from 8/4 white pine. This is readily available and easily worked. Pine doesn’t burnish and become as slippery as oak.
