Low Bench that is light, strong, and takes apart
Here is a light but very substantial low bench that can be easily assembled and broken down. It uses no glue, wedges, wet/dry construction or any other manner of fastener. The harder you sit, the tighter the fit.
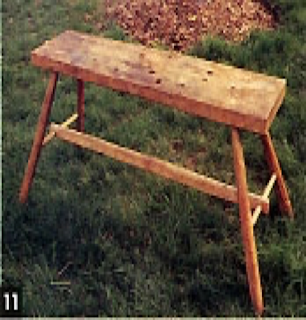
My 25 year old oak low bench
The oak bench top measures 3′ x 9″ x 1 1/2″ and the bench itself is 19″ high. The under structure is light. The complete bench weighs 17#. It is sturdy under the impact of a 9# sledge. In my chair making shop I am dealing with short lengths but, I will make my next one 5′ long. It travels around the shop used as a saw bench, light riving bench, low sit upon work bench with both peg and threaded holes in its top.
It is easy to make. Friction fit four splayed posts with 6 degree tapered tenons into the bench top. Add two end straight dowel stretchers with their ends whittled to fit loosely into sockets in the flared posts. So far, a flimsy collection of one board and six sticks- no wedges, glue or moist-dry interference fit. Just dry loose fitting joints.
The seventh stick is an enclosing medial stretcher longer than the distance between the two end dowel stretchers. The long enclosing medial stretcher has dowel diameter holes through each end. It is slid onto the middle of the end stretcher dowels for a loose fit. The dowels are a bit fatter in the middle. If desired, this joint can be pegged. Take down is simple. Tap the tapered posts down through the bench top. Be careful of your feet while breaking down. Permanently number each stick and socket for reassembly.
The bench lacks the exquisite open geometry of the stake design. But, it is of amazing light weight and tougher by far. It is easier to construct. It will handle severe pounding, will store, travel, and work for years without the need for massive permanently installed stakes and is easily broken down into a board and 7 sticks for storage or travel.
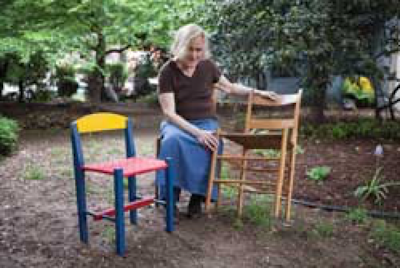
The enclosing medial stretcher also suggests itself for stick chair or stool construction. Here is a child’s chair.
About the 6 degree saw steel tapered wooden reamer developed by Richard Starr. I suggest many commercially available tapered reamers have too much taper. Starr’s original tapered saw steel, wooden body, reamer used a saw blade with close to a six degree included angle. I still use it. Carl Swensson later tested a number of included angles and found that the 6 degree taper creates the best grip.
During its hasty original construction I left the saw teeth on one side. It worked well. The slightly exposed tips of the saw teeth cut up the shavings from the burr on the blade’s straight edge into little bits (reamoids) that easily flow down the escape channels. I would like to hear if anyone has used exposed saw teeth and burr edge on the opposite sides of the 6 degree saw steel blade and the results. More on the tapered saw steel wooden body reamer is found at www.greenwoodworking.org