Making Handles and Chair Rung Tenons
Text By John Alexander
Photos By Peter Follansbee
For years I have made octagonal handles for chisels, knives, awls, burnishers, files, and other tools by shaving stock held between two fids (pointed metal centers). I drove the fids into wooden puppets secured to pipe clamp face and shaved stock with a drawknife, spokeshave, or block plane. (See my book Make a Chair from a Tree)
When I acquired a cabinetmaker’s bench with an end vise, I mounted puppets in the dog mortises. This was better yet. The use of fids to hold sticks for shaving has a long history among chair makers and wheelwrights. Handles can be made in any convex cross-section; square, octagonal, round, or oval are the most common.
When shaving octagonal sticks, first square the stick and then carefully and symmetrically chamfer off the corners. If the stick is to be tapered (such as a tool handle), first shave a taper with a square cross section and then chamfer. It is difficult to accurately whittle the butt end of a handle or to whittle a tenon for a ferrule, leather bolster, or metal ring. Using a lathe is the best solution.
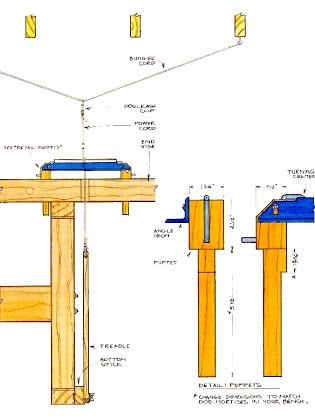
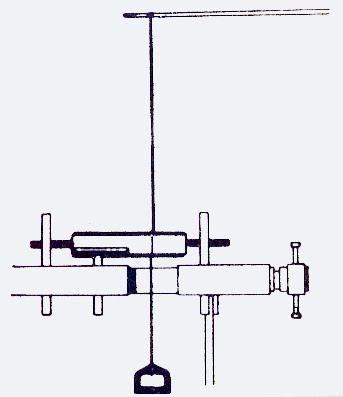
Viires, Woodworking in Estonia, illustrates a simple pole lathe erected on the end vise of a cabinetmaker’s bench. [1a] It has one substantial limitation. Because the power cord must run through the opening of the end vise at a fixed location between the puppets, some of the stock cannot be readily turned without reversing it in the lathe. But the lathe is simple, inexpensive, and useful, particularly for turning the ends of stock. It takes up no extra room in the shop and can be set up and taken down in a minute. It is extremely handy for turning the ends of tool handles and tenoning chair rungs. Initially, the reciprocating rotary motion foot-powered pole lathe may appear unwieldy. However, it has two important advantages. The pole lathe is universally and instantly variable as to both speed and power. Slow, variable speed greatly assists in making close tolerance tenons. The slight necessary learning curve is worth the effort.
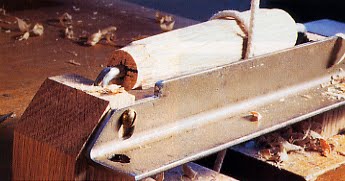
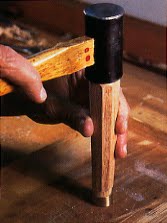
To start, attach a horizontal bungee cord to the ceiling above your end vise. My cord runs from rafter to rafter. A flexible pole, screen door spring or bow can be use. Attach clothesline (the power cord) to a metal ring and slide the ring on the bungee cord. I use regular clothesline. Nylon will last longer but will provide less friction. Wrap the power cord around the stock between the puppets so that a downward pull rotates the stock towards you. [2-4]
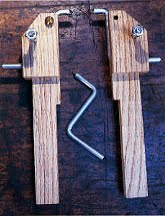
These fids may be easily removed and a longer or shorter one inserted if necessary. Bend the fids so that their vertical shafts are equal in length. Lightly notch the rod on the inside of the bend. Line the notch up with the top of your metal vise jaws and bend the rod with a hammer. Make the fid you shave or plane towards short so that the tool edges will miss it when you are roughing out stock. These fids allow you to taper the outward sides of the wooden puppets, thus allowing even more tool clearance. Make one fid long enough long enough so that a ferrule can be hung on it during turning.
I try to keep things simple and use traditional techniques and materials and supplies available in a well-equipped hardware store (bungee cord, clothesline, lag bolts, and dog leash clips). Traditional tool rest design doesn’t scale down well, so I use 1 ¼” angle iron (from an old bed frame) for the tool rest. I use one piece about 14″ long for turning handles and other short stock, another 24″ long for chair rungs. These dimensions may vary due to your bench dog dimensions. One end of the angle iron tool rest is secured to its puppet by a keyhole that is drilled and filed into its end. This keyhole drops over a screw in one puppet. [7]
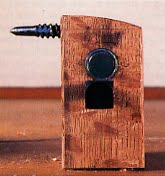
The other end of the tool rest is supported by a lag screw screwed into the other puppet. Held against the puppet by the head of the bolt, the rest slides along the bolt. [8]
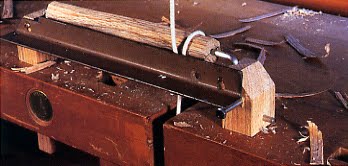
The keyhole, screw, and lag bolt must be carefully located so that the top of the tool rest is horizontal and at the same height as the line between the fids. In an alternative approach, lag bolts in each puppet support the tool rest and ½” diameter earth magnets above each puppet hold the tool rest snugly against the puppets. [9] The magnets are available from Woodcraft (800) 542-9115 and Lee Valley (800) 871-8158. Not traditional but they work well.
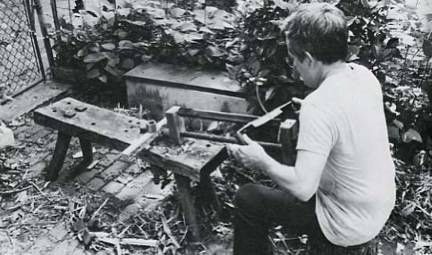
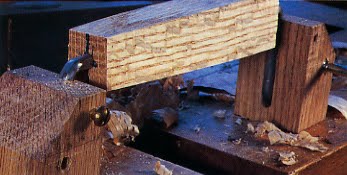
Now we can make a simple octagonal handle with a brass ferrule and a rounded or domed end. Do not try to turn irregular or square-sectioned stock. The pole lathe’s reciprocating motion causes excessive vibration when the turning tool is placed against a square or asymmetrical revolving surface. First square and then shave the stock into an octagonal cross section. Though not necessary, I prefer to use split-out green wood. Splitting is quicker than sawing and I immediately learn whether the stock is straight grained or firewood. Also, wood containing substantial moisture content turns easily. Saw to length. Marking a line in the direction of the ray plane across the center of each end of the stock makes it easier to methodically rotate the stock during shaving. Make sure that the direction of the stock’s long fibers is in line with the line between the fids. Tightly secure the stock between the fids and shave to a square cross section with a drawknife, spokeshave, or block plane. This use of the lathe puppets avoids using a shaving horse, which in any event does not hold short stock well. [10]
Always shave or plane towards the short fid. If you want a tapered handle, taper the squared stock. Next, take even corners off the work, leaving a tapered octagonal cross section. Make your octagonal stock oversized so that you can make later corrections if necessary. Next, bring the power cord down in front of the work piece, wrap it around one time, pass it inside of the tool rest, and clip it down to the treadle. Loosen the stock between the centers so that it is just tight enough that it doesn’t wiggle laterally and so that, after the treadle is released, the bungee cord quickly returns the stock to its original position. The bungee cord need only be powerful enough to accomplish this. If it is too powerful, it will oppose the downward stroke. If the stock squeals as it turns, rub an old candle or paraffin across the dimple at each end. Check the handle stock for symmetry by turning circlets at the ends of the stock having the handles major and minor diameters. [11]
This will tell you if your rough shaved flats need correcting. If necessary, remove the power cord and clip it up to the bungee cord ring, a quick and easy task. Tighten up the stock and shave it using the turned circlets and the end ray plane marks as a guide. [12]
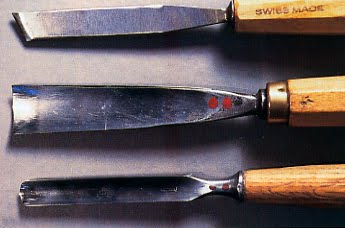
Pole lathe turning is not that difficult. Use light, small, and very sharp carving tools. I use one skew chisel, one gouge, and one ladyfinger gouge. [13]
Use the gouge first. Lay the tool on the stock and, as you treadle down, slightly advance the tool. As the bungee cord reverses the rotation of the stock, slightly-ever so slightly-release the pressure of the tool against the stock so that it lightly rubs against the retreating surface. If you release the pressure too much you will loose the correct cutting angle for the next downward stroke. With the next downward stroke slightly advance the tool again and so forth and so on. You will develop a rhythm in which breathing, treadling, and tool pressure are synchronized. Always use a shaving cut. Compare your handle and ferrule cross sections so that when the ferrule is driven onto the tenon, the handle will taper smoothly down to the ferrule. There may be times when, due to the length of the handle you are making, the power cord will be too close to your turning tool. Reverse the stock. Cutting the power cord is a quick and definite bummer.
Light gauge brass ferrules are available from Lee Valley, heavier ones from Woodcraft. I purchase heavier brass ferrule stock from a local scrap metal dealer. Copper gets ugly with time, no matter how you initially polish and lacquer it.
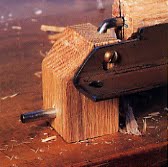
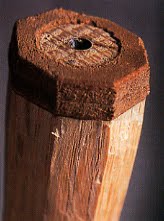
To make a ferrule tenon, hold a skew chisel blade with the bevel up and perfectly perpendicular to the tool rest, and score the stock the ferrule’s length until the scored mark is completely inside the octagonal surface of the stock. Slide the ferrule onto the long fid and turn the tenon, continually checking its diameter against the ferrule. [2] If the moisture of the stock is above equilibrium moisture content, turn the tenon oversized and dry it in your stove or kiln at 100 degrees F, until the stock stops losing weight. I use a postage scale. The tenon is now bone-dry. If the stock is very green, let it air dry before cooking it or commence drying at a lower temperature. If, when bone-dry, the tenon is still too large, trim it down on the lathe until it is still very slightly oversize and then drive the tenon into the ferrule. [14]
The bone-dry tenon will swell as it absorbs moisture and the use of epoxy can be avoided. For starters, cook the tenon and also have epoxy at hand.
Not all handles need ferrules. A fancy brass ferrule on an awl is
attractive but not necessary. If you need to install a leather washer on the butt end of a striking tool, make the cap tenon the same way you made the ferrule tenon. I use sole leather scraps and barge cement (available from your shoemaker) to secure the leather. When dry, trim the leather with a chisel. [15]
Some chisels have tapered sockets. Most often the interior and exterior socket tapers are the same and the wooden taper can be turned by inspection.
Many tool handles are round simply because they are turned on lathes. Round handles have no necessary utility. Octagonal handles are easier to hold and don’t roll when placed on flat surfaces. Though I favor octagonal handles, you can shave or turn round handles and then turn the ferrule tenon on the pole lathe.
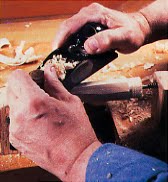
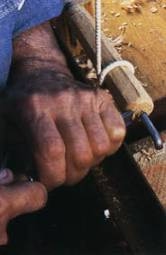
Rounding off or turning a dome on a handle’s butt end can be challenging. I use a ladyfinger gouge because, at my skill level, the convex edge of the gouge falls away from the convex turned surface on both sides, thus avoiding dawks. When starting, it is helpful to first remove as much wood as possible with the skew chisel. Then slide the ladyfinger gouge off the handle’s taper and turn the dome by gradually raising the gouge handle and, at the same time, gradually moving the gouge handle away from the stock. You must synchronize your breathing, treadling, and gouge pressure and directions. While performing this dance, make sure that the edge of the gouge never ceases shaving the surface of the dome. Always aim the tip of the gouge towards the center of the dome stock. [16]
This is not an easy cut. Practice on scrap stock. Have a rasp handy to clean up the first, almost acceptable handles. Until you attain a certain skill level you can chamfer the end with a knife.
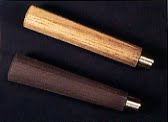
When beginning, use softer woods like ash or soft maple. If possible, start with green wood. Another material is TREX, a composite decking product consisting of approximately equal portions of thermoplastic (recycled grocery bags and stretch film) and waste wood dust. Though not handsome, it shaves and turns like cheese and is comfortable in the hand. [17]
I finish handles with walnut oil. It is available at well-stocked grocery stores, relatively inexpensive, and easy to use. Dilute with mineral spirits and apply lightly. Remove the excess with a dry cloth.
The same techniques apply to chair rung tenons. If the rungs have already been turned, line them up in the lathe between their original turning centers and turn the tenons as described above.
If the rungs are to be shaved, it is important to determine the tenon turning centers and diameter before shaving. Saw the rung stock to exact length and line it up on the lathe. Shave the stock to an over-sized octagonal cross section at the shaving horse, or remove the power cord and shave all the stock between the fids. Then turn the tenons to their exact diameter. Tenon gauges are made by hack sawing and filing a notch out of a strip of mild steel. [18]

18 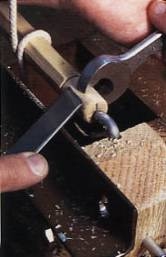
19
Sometimes you can use an open-ended wrench as a gauge, adjusting it with a file if necessary. [19]
Finally, shave or turn the rungs into the desired cross section using the tenon diameter as your guide. You can do away with tenon shoulders by shaving the rung surface so that it blends into that of the tenon. There is no need to chamfer the tenon ends on the lathe. After the rung is removed from the lathe, simply vigorously rub the edge of the tenon ends against the end grain of a hardwood block. This is quick and accurate. The resulting micro chamfer preserves the maximum amount of tenon bonding surface.
In traditional wet-dry chair joinery, the post’s moisture content at assembly is slightly above equilibrium moisture content and the rung tenon is bone-dry. The tenon’s diameter is slightly larger than that of the mortise. Use green wood for all of the above steps and kiln-dry the rung-and-tenon. Experiment with the diameter of the green tenon so that when it is bone dry, it will already have the desired diameter along the direction of the previously marked ray plane. The tenon will now be slightly oval in cross section, taller in the direction of the ray plane line, and smaller across the growth rings. Drive the tenon into the mortised stock with the ray plane line parallel to the long fibers of the mortised stock. It will take some experimenting to determine the exact diameter of the green tenon, but once you determine it you can make a gauge for the species of wood used in the rung. This is one of the traditional ways that post and rung chair and Windsor chair rungs were tenoned. What is one of the most difficult aspects of traditional wet-dry chair joinery becomes fast and routine. For a more detailed description of this technique see Mike Abbott’s, Living Wood, Second Edition, 2004, available from www.living-wood.co.uk.
What started out as an interest in handle making led me to make a simple pole lathe. Relatively little time and effort was required. Now I have all the handles I need. The pole lathe allows me an additional way to fashion traditional chair rungs.
I thank Carl Swensson and Peter Follansbee for their assistance with this project and article.
This article updates an article originally published in the June, 2000 issue of WoodworkMagazine.