The 17th Century Draw Bored Mortise And Tenon:
The Heart Of Joinery
By John Alexander
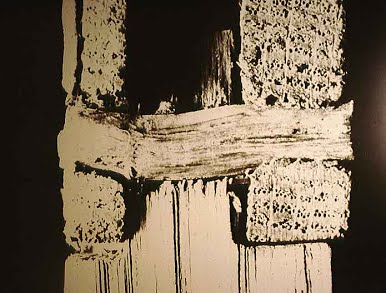
When I first examined 17th Century New England draw bored mortise and tenons, the joints were tight and finished on the outside, but I found the hidden parts of the joint crude and sloppily made. I based this conclusion on the following observations:
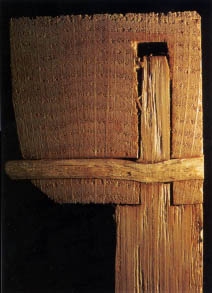
- Tenons usually doesn’t fill mortise height.
- Tenon width is less than mortise width.
- Outside tenon shoulders are undercut – only an outer knife edge touches the stile.
- Inside tenon shoulders don’t touch the stile at all – they are not “in the joint”.
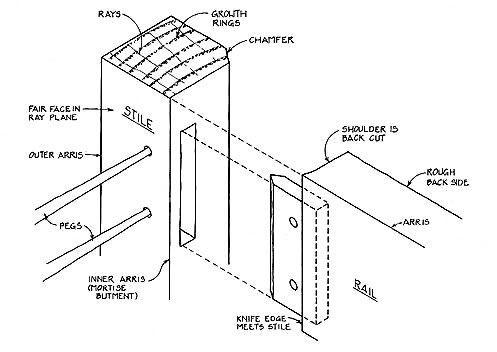
- Rails have only one fair face – they are unfinished inside and taper in cross section.
- Stiles have only 2 fair faces and 3 true arrises and their inside arris may be chamfered away.
- Heads of the drawing pegs are proud of the stile faces.
Clearly, this is not the carefully made cabinetmaker’s glue joint where the tenon fits snug in the mortise. Having studied mostly 17th Century New England joint furniture, I thought the joint was solely the result of 17th Century “worklessmanship” – the produce of an immigrant society where labor was extremely expensive. After 15 years of research, shopwork and teaching, I have decided that, as is so often the case, there is more here than meets the eye. Students at my Greenwoodworking Shop have made a thousand draw bored mortises and tenons – each joint stool has sixteen – there have been only 6 failures and I made two of those.
Making the Draw-Bored Mortise and Tenon
Let’s get some recently harvested white or red oak from the woodpile and make a draw bored joint. We’ll learn that the joint’s apparent shortcomings are purposeful responses to fabricating and assembling wood when still green. In joinery, the stock is split (riven) from the tree and prepared while tree wet. At time of assembly, the stock still contains considerable moisture content. The draw bored mortise and tenon and the joined frame and panel are constructed to avoid wood’s dimensional changes during its initial descent to ambient moisture content and thereafter throughout its useful life. The joiner’s frame can be assembled from tree wet wood. “YUK! But won’t it crack, twist or cup as it dries?” Not if the wood is rived from the straight grained trunk of a ring porous hardwood and the mortise and tenon are made as described here.
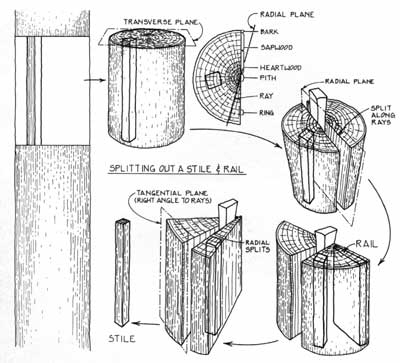
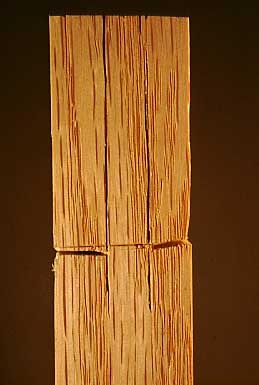
The Stock
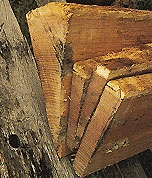
Take a straight grained, knot free red or white oak log 12 inches long and large enough in diameter to produce several clean 2″ x 2″ pieces. Rive along the ray plane with a dull axe or wedge and a wooden club. The finished stock must not contain sapwood, juvenile wood or pith. Then rive several pieces of 1″ x 2″ rail stock with the 2″ face of the stock in the ray plane. Stiles are square in cross-section. The rails are rived with ray planes on both faces. I have coined the word “truncadon” to describe the resulting triangular cross-section – a characteristic signature of 17th Century New England joinery. The rail while, in theory, 1″ x 2″, will taper in thickness due to your riving along the rays.
The Rail
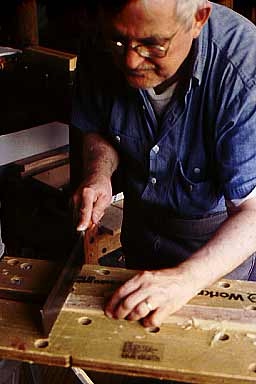
Select the fairest ray plane face on your 1″ x 2″. Plane it flat using winding sticks and straight edge. If the face is rough or much out of truth, first use a scrub plane – a plane with a flat blade and a convex edge. Worked diagonally to or across the long fibers of the stock – the scrub plane removes wood rapidly. A wooden bench plane can be made into a scrub plane by changing the curvature of the blade and, if necessary, opening up the throat. A metal plane can be modified – set the frog back as far as possible to allow for the maximum throat width. Clean up the stock with a smooth plane. Planes must be thoroughly cleaned and the metal lightly oiled after every use lest acid from the green oak stain and etch the metal.
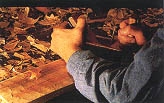
Preparing rived rail stock by scrub planing
If the rail is more than 1″ thick, plane down the inner face with the scrub plane. If the rail is much too thick, rive the excess off. Lay out on arris on the top of the rail by drawing a line exactly in the direction of the rail’s long fibers. Plane the top edge so that it is slightly less than 90° to the fair face. Use a straight edge to check the intersection of the fair face and top edge – the true arris. It is crucial that this one arris be straight – the tenon shoulder will be laid out from it. Mark the intersection of the fair face and the true arris. Set your marking gauge to 2 inches and gauge down from the true arris. Split off any excess and plane the bottom edge of the rail – here again the bottom of the rail falls slightly away from the fair face.
When completed, the rail will have one fair face (the outside) and one true arris (at the top). The inside face will be rived or hewn. If necessary, clean up the inside face just enough so that it won’t catch your sweater. Don’t bother to flatten or square the inside face.
The Stile
The stile must be straight grained with both its outside faces lying in the direction of the wood’s long fibers. Reduce the stock to a 2″ x 2″ cross section with one fair face on a ray plane. Fair up the outside ray plane face first. Mark your outer arris on this fair face in the direction of the long fibers. Plane the other outer face. The two outer faces must be fair and square to each other and the arris at their intersection must be a straight line. Mark this arris. Set your marking gauge at 1 3/4″ and scribe the width of your fair face from the outside true arris. The inner arris of the stile’s fair face is crucial. It must be straight and parallel to the outside arris. I call this arris the mortise butment because the outside tenon shoulder buts against it.
The stile’s inner face (as opposed to the mortise butment arris) is neither structural nor particularly visible. There is no need to square it to the fair face. Indeed, slightly “undersquare” this inside face. Chamfer the inside corner of the stile. Defer final clean up of the fair faces until a day or two after assembly when the surface of the stock is drier. Wood will only clean up so much when green.

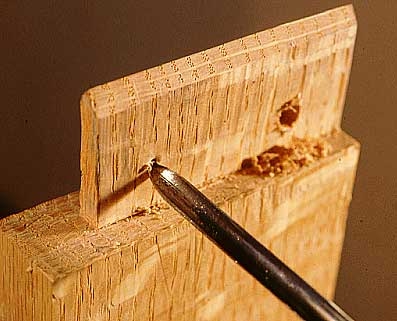
The Mortise
The top and bottom of the mortise are laid out with the square and a knife. The stock of the square rests against the fair outside face of the stile. The chamfered inside corner of the stile is inaccurate and cannot be used for layout – one reason it is chamfered is to help you remember this. To strengthen the joint against racking, I make the mortise height 1/16″ less than rail height and later trim the tenon height to fit.
The width of your mortise chisel controls the width of the mortise and tenon. Use a 5/16″ or 8 mm wide mortising chisel or a slightly larger size. Set the mortise marking gauge to the mortise chisel width and then locate the inner gauge pin one chisel width away from the marking gauge’s cheek.
Mortise when the wood is green. It is easy. Experiment. Mortise in both green and dry stock and in both the ray and growth ring planes. Notice the difference. Green wood mortises are messy looking. Don’t worry, you’ll be the last to see them. Some fear the Green Man will get them if the insides of joints are not precise and clean. This is true of the Glue Man. The Green Man is very forgiving and insists that you move along.
The two outside stile faces must be fair and square. The further face rests on the bench as you mortise. The mortising chisel is held perpendicular to the bench surface not to the stile’s unfair inside face.
Chop the mortises about 1 3/8″ deep and within 1/8″ of the top and bottom marks. Mark the mortise depth on your mortise chisel with a magic marker. The remaining wood at the top and bottom of the mortise is then removed by light chopping cuts. Use an adjustable combination square as a depth gauge. Slide the square along the stock to check for interference along both the bottom and ends of the mortise. The outer mortise cheek is important. It must be parallel to the stile’s true face. If necessary, clean up the outer mortise cheek with a wide paring chisel. The configuration of the tenon shoulder and the draw boring will draw the outer tenon cheek against the outer mortise cheek – the inner cheek is not involved in the joint.
The Tenon
Working the mortise marking gauge from the rail’s fair face lay out tenon width across the top, end and bottom of the rail. The mortise is 1 3/8″ deep – the tenon will be no more than 1 1/4″ long. Tenons must not be near to the bottom of the mortises nor adjacent tenons. After assembly, the mortised stiles will shrink in cross section – tenon length will not change. If the mortise shrinks up against the end of the tenon, it will force the tenon from the mortise and oppose the action of the drawing peg. Whatever the depth of the mortise, make the tenon 1/8″ shorter. In future work, make sure that adjacent tenons avoid each other by at least 1/16″.
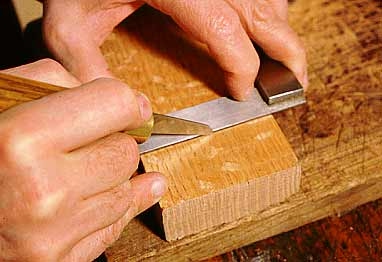
Knifing in the tenon shoulder with the square referenced along the rail’s fair face.
The tenon shoulder must be perpendicular to the rail’s true arris. A scoring cut is made on the fair face with the square and a sharp knife – deep enough so that a 1/32″ deep trench can be chiseled outside of the line. Secure the rail while scoring this line. This line is critical. Goof up and there goes the joint. With the square and knife lightly carry the shoulder line across the top and bottom of the rail. Then mark a phantom “shoulder” line on the rail’s inside face by joining the lines on the top and bottom edges of the stock.
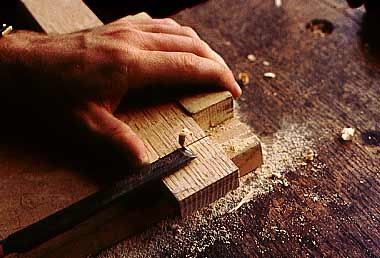
along the rail’s fair face
Paring a trench outside the line
Pare a triangular cross sectioned trench between about 3/16″ wide across the fair face outside of the scored line. The scored line becomes the vertical edge of the trench. Now lay a dovetail saw or backsaw in the trench. The saw teeth rest below the fair face. The knife edge you have scored is the final finished tenon edge – it will never be worked again. Undercut the outer tenon shoulder – about 5° off the vertical. Saw down to the tenon line, no less no more. Next, saw the inside tenon shoulder inside the layout line on the back of the rail. The inside tenon shoulder is not a part of the joint. Make sure that none of it projects outside of the knife edge of the outside tenon shoulder.
Top view of rail, shoulders
appropriately undercut
Because straight grained rived stock has been used the waste outside the tenon cheeks can be split off with a broad chisel or small cleaver. Split off the inner cheek waste first. The accuracy of the inside cheek is of no importance to the joint so rive on the line. Then, split parallel to, but slightly outside, of the outside tenon line. Clean up the cheek with a broad chisel. Use a combination square with its blade extended 5/16″ to check that the outside tenon cheek is parallel to the rail’s fair face. The mortise and tenon should be a loose fit cheek to cheek. Remember, you are not making a glue joint. Test tenon thickness and shoulder height by slipping the tenon into the mortise at an angle. Check that the fair faces of both rail and stile are in the same plane. Make 45° chamfers on the end of the tenon with a chisel. Any mess remaining in the mortise will be pushed aside when the tenon is inserted. Chamfering also prevents adjacent tenons from touching each other.
If all stock is rived from the log at the same time, the thinner rail will dry faster that the stile. The tenons will dry faster yet. They are thin. Also wood loses moisture much more rapidly from its porous end grain. At the time of assembly the tenons will be drier than the stile. It must be dry enough so that the tenon peg hole will not deform when a tapered bone dry peg is driven home. I find it useful to make the rail and rough shape the tenon, before I make the stile and chop the mortise. This gives the tenon more time to dry. Plane away the bottom of the tenon so that the tenon slides into the mortise. Make any adjustments now, before the tenon peg hole is bored. Make sure that the knife edge tenon shoulder rests upon the butment arris and that the rail’s true arris is perpendicular to the mortise butment.
The Peg Hole
Peg holes are 1/4″ or slightly larger in diameter. Use a brace and any manner of bit. The peg hole is located on a line 3/8″ in from the mortise butment and bored from the true face. It is centered between the mortise top and bottom. Bore the stile peg hole with the tenon removed.
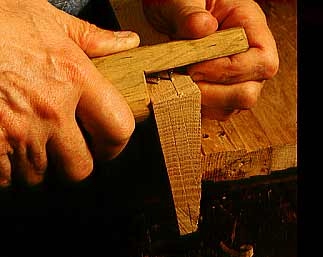
Assemble the joint tightly and carefully scribe with an awl the outline of the stile peg hole on the outside tenon cheek. Withdraw the tenon and bore the peg hole on the tenon cheek about 1/16+” closer to the tenon shoulder. When a tapered peg is driven through the offset tenon hole it will draw the tenon into the mortise and hold the joint together. First, reassemble the joint and sight through the peg holes. If you bored the tenon peg hole too close to the tenon shoulder, the cusp of the tenon peg hole will fill one third or more of the stile peg hole. Prick out offending fibers from the outboard edge of the tenon peg hole with an awl. A metal draw bore pin determines if the bored offset is correct and the joint tight. Any rod that tapers from 5/32″ to 5/16″ in 4″ can be used. A machinist’s alignment pin, Craftsman No. 42901, Stanley 18-897, or equivalent, is perfect. Or use the shaft of a sturdy tapered awl. When the metal draw bore pin is firmly driven home the joint will pull tight.
With the metal draw bore pin in place, again use the square to check the angle between the stile’s mortise butment arris and the rail’s true arris. The knife edge of the outer tenon shoulder must be tight against the mortise butment. The inside tenon shoulder must not touch the stile. The end of the tenon must be 1/8″ away from the bottom of the mortise. The stile and rail true faces must be in the same plane.
The Peg
When riving stock save the split offs for pegs. Rive 1/2″ square foot long sticks from perfectly straight grained stock. Hold the stick in a shaving horse or vice and draw knife or spokeshave a 2″ long square on one end. Reverse the stick and make an 10″ long taper from 1/2″ to 3/32″. After the tapered square is finished, shave off the corners and point the peg. It is easier to shave the pegs from green wood.
Whittling pegs is an alternative. However, I suggest that at first you shave pegs with a draw knife or spokeshave and methodically work from square to octagon. This appears to be a bother – especially if you don’t have a shaving horse – but these slender pegs are the heart of the joint. To be the best they can, they must be perfectly straight grained, flexible and have a gently tapered octagonal cross section. The gentle taper allows the peg to flex and snake its way through the offset hole in the tenon, draw the tenon completely home and fill both the stile and tenon holes. At assembly the stile should still have sufficient moisture content so that it will compress under the pressure of the bone dry driven peg.
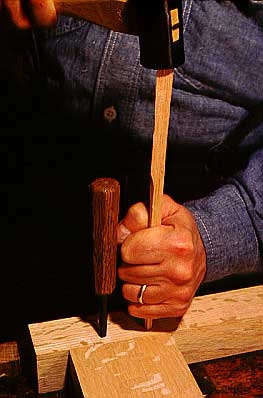
Assembly
The peg must be bone dry at the time of assembly. Cook it in the oven at 125°. The tenon should be air dry and the stile moist. Hold the long peg securely in one hand and the hammer with the other. As you drive the peg home you will hear an increase in pitch as the vibrating peg shortens. You will feel the peg solid up. Saw off the driven end of the peg leaving about 4″. Drive this shorter, sturdier projection a little further. When you apply the power necessary (by moderate repeated blows) and hear the rising tone of the shortening peg and the thunk as it goes home you experience, as my friend Danny Barker used to say, “a real primitive deal!” If a peg hangs up, breaks or shatters during assembly – a ghastly situation – you may be able to drive it back out from the inside with a pin punch.
Saw the peg off close to the fair face and finish with a chisel. On the inside the projecting pegs can be sawn, chiseled or knocked off with a hammer. Predict what will happen to the peg as the stile dries and shrinks.
Conclusion
After assembly the stile and rail fair face will be dry enough to clean up the true faces with a well sharpened smooth plane or low angle block plane. Let’s have a look.
- The tenon doesn’t need to fill the mortise height because the joint is strong enough. (I still like the height of tenons to fill the mortise to oppose racking).
- The tenon is narrower than the mortise so that it will not split the green stile as the stile dries and shrinks in cross section.
- The outside tenon shoulder is undercut and knife edged so that it is not forced out of the mortise as the square sectioned green stile becomes diamond shaped as it dries.
- The inside tenon shoulder does not touch the stile at all for the same reason.
- The inside of the rail is unfinished and not parallel to the fair face – there is no need for it to be.
- The stile has only 2 fair faces and 3 true arris because the outside tenon shoulder is knife edged.
In time, the green stile will shrink in cross-section while the length of the peg remains the same. The peg head will project above the stile’s fair face. From our construction and examination of this apparently crude joint, we learn that it is stronger than it needs to be. Because it is a joint made from green wood it can be made no other way. It is simple and sophisticated. As David Pye said: Because people are dead, it does not follow that they were stupid.